Showing posts with label Birthday cake. Show all posts

Friday, 27 July 2012

22!

So, I had a complete mind blank and forgot to take ANY photos of making my birthday cake or even of when it was completed. I kinda wish it was feasible to invite photographers to house parties to capture moments as I often forget where I've left my camera and the photos I did take are pretty dire...

So, here is a photo I have shamelessly stolen off Faye! (Who has such a cute blog that you should check out called Dinosaur Circus.)

The cake was marble, sandwiched together with vanilla frosting and then just plain old fondant to cover it all. I'm still pretty hit and miss with my fondant technique, but thank goodness for ribbon as it hides all sins! For decoration I dyed some fondant blue with Sugarflair food gel and cut it out with a star cutter I had lying around. Simple but effective! It was said that it looked a little bit like a Christening cake for a boy, so there's an idea for you all if you're stuck.

I am being a terrible cake blogger at the moment for which I can only apologise. I'm leaving Dundee two weeks today (sob) to move into a new flat in Stirling before starting a postgraduate course in Publishing, so I think it'll take a little while for me to get settled (plus find a new photo spot! Goodbye beloved window sill with your lovely natural light and also goodbye to you giant kitchen...)


However, I do have a few cakes that I haven't blogged about yet, so I'll get those posted soon. Until next time!


Friday, 22 July 2011

My 21st birthday cake!

Hello strangers! Sorry for going AWOL, after my final university exams (hurray!) I went on a little bit of a summer slack. That, and started going to the gym, so didn't do a lot of baking, but now I'm back with some photos of my birthday cake! 
I used my now go to sponge recipe with added vanilla extract by Mary Berry which I would highly reccomend, as the sponge is so moist! I made this cake on the Thursday to be served on Saturday night, and it held up really well.

The larger bottom layer was marble cake achieved by making two lots of the sponge recipe, and subsituting a little of the flour in the second batch to add in cocoa. The top layer was just a normal sponge, and both cakes were sandwiched with vanilla buttercream frosting and covered in fondant.


I bought the sheer rainbow ribbon off the internet, and the cake topper from an eBay seller called karenkakes, who sells toppers ready to go and also takes orders. So, if you are wanting a topper for a special occasion, definitely give her shop a look!
For my 21st I had a ceilidh with over 50 guests, so I was a little nervous that the cake would topple mid dance since I didn't put in any support structures. However, everything turned out fine and I received many positive comments on the cake. I especially enjoyed when people asked who made the cake and I could reply 'I did!' to their surprise.
 Now, time to start planning the cake for my 22nd...

Sunday, 29 May 2011

Cakecuccino's First Birthday!

A year today I started this blog! I'm really proud that I've managed to keep it updated on a (semi) regular basis, and hopefully will be able to do so for the next year. 

To celebrate such an occasion, we obviously need a cake...
 Though, I actually made this cake for my friend Faye's 21st birthday! (She also has a blog called 'Cooking with Faye'). It took quite a few hours to make, but I blame that on the fact that I only had two cake pans...
Rainbow Cake

250g butter
250g sugar
250g self-raising flour
4 eggs
Vanilla extract (optional).
6 food dyes of your choice.
Ready to roll fondant.


Frosting

125g unsalted butter
250g icing sugar
1-2 tbsp milk
1 tsp vanilla extract


Method
1. Preheat the oven to 180 degrees.
2. Cream together the butter and sugar until light and fluffy, then add an egg with a tablespoon of flour and mix thoroughly. Repeat with each egg, and then add the rest of the flour. Also, add in the vanilla extract if using.
3. Seperate the cake mixture into 6 different bowls. 

4. Add in your colouring, and mix thoroughly. 
 
 
 5. Pour the mixture into prepared 8 inch cake pans, and then bake for around 10-15 minutes or until a skewer comes out clean or the sponge bounces back when pressed.
 6. Prepare your frosting while the cakes cool. With an electric mixer, mix together the butter and icing sugar, adding a splash of vanilla/milk until the frosting is light and fluffy.
7. Decide on the order of your layers, and then frost the cake layers together once cool.
 
 8. If using fondant, spread a thin coating of frosting over the cake which will help the fondant to stick.
9. Dust your counter with icing sugar, and roll out your fondant to around an eighth of an inch. (In order to prevent the fondant sticking to the counter, flip it over and dust with more icing sugar).
10. Carefully roll your fondant over your rolling pin, and then roll back over the cake smoothing down the sides.

 My fondant techniques leave a lot to be desired, but I'm sure there are plenty of how to videos available over the web to help ensure a smoother finish than mine!

(Note : It is best to use food dye gel to produce vivid colours, but I was unable to locate any in the time I had. I used a mixture of liquid colouring, which to help the colour, I added a little bit of cocoa powder to the cake mixture. I also used Sugarflair colouring (the blue and the lilac layers) which I think turned out quite nicely, so I would reccommend those if you can get your hands on them. For the yellow layer, I just left it plain).

Although on the outside this cake looks rather plain, the real surprise comes as the cake is cut! 


Thursday, 5 May 2011

Kit Kat & Smarties Cake!

I've seen this idea floating around on various websites, and thought it was particularly clever! I'm not sure if anyone watched 'Baking Made Easy' on BBC1 with Lorraine Pascal, where she decorated a cake with chocolate cigerellos. Although the final product was beautiful, the price of the cigerellos were a bit out of my reach (over £30!), so this idea is perhaps more of a version for those on a budget, but still looks pretty amazing.

Ingredients:
For the sponge:
225g unsalted butter
225g caster sugar
4 large eggs
225g self raising flour
2 tsp of baking powder
1 tsp of vanilla extract (optional)
Frosting:
125g unsalted butter
250g icing sugar
1-2tbsp of milk
1 tsp of vanilla extract
Decoration (for an 8 inch cake):
18 x 2 finger Kit Kats
5 tubes of Smarties (Or whatever you fancy topping it with!)

Method:
1. For this cake, you can use your favourite cake recipe. I chose to use Mary Berry's classic victoria sponge recipe, with a dash of vanilla extract. You can find the recipe and method  here!
 2. After the cake is cooked and completely cooled, you can start the frosting. Whisk together the butter and the icing sugar (for best results, use a hand mixer for this), adding it a splash of the milk and vanilla extract at a time. It is best to whisk for around five minutes for a light and airy frosting. (Also take this as an opportunity to make sure that the Kit Kat is slightly taller than the sponge when placed together, if it is not, you will have to trim the sponge down a little).
3. Place a small blob of frosting on top of your cake board, and then place the bottom sponge on top. This will act like a glue to keep the sponge in place.
4. Using a palette knife, place a large blob of frosting on top of your bottom sponge, and spread across evenly.

 5. Place the other sponge on top, and then proceed to frost the cake entirely. Don't worry if it looks messy, as it's going to be covered completely by sweeties!
6. Using the left over frosting, spread a little on the bottom of the Kit Kat, and press firmly on to the side of the cake. Again, this will act like glue holding the Kit Kat in place. Repeat until the whole cake is covered.
7. Scatter your smarties (or whatever you've chosen) across the top of the sponge. And you're done!
 
Until next time!

Tuesday, 20 July 2010

20th Birthday Cake!

It was my 20th on Friday so I decided to make my own cake. I chose to do a two layer cake sandwiched together with vanilla frosting and covered the cake in fondant to try and make it look like a parcel. I also bought some blue food dye to dye some fondant in the hopes of doing polkadots and a bow.

I had to make the cake on Wednesday due to other commitments and baked two 8 inch plain sponge cakes and allowed them to cool before sandwiching together with the vanilla frosting. I then rolled out some fondant. I used Dr. Oetker's Ready to Roll fondant as there was no way that I was going to attempt to make fondant, let alone at 9 at night. (Side note : ready made fondant was really difficult to find in my local area, my brother ended up finding a couple of boxes at Morrisons, thank goodness!)

I covered the counter in icing sugar and rolled out the fondant until I thought it would cover all sides of the cake. I then put the fondant over my frosted cake. Uh, well I would've if the fondant hadn't stuck to the counter and ripped everywhere. Do over! I covered the counter in MORE icing sugar and tried again. Success! I smoothed the fondant over the cake and then cut off the extra bits which I would use to dye blue.

I've heard food paste is better to use to dye fondant with so I ordered a bottle from the website called Cakes, Cookies and Crafts The food paste I used was called Sugarflair which is suitable for vegetarians. They suggest using a tiny amount on a cocktail stick and then knead into the fondant. I did this a couple of times adding some more paste until I was happy with the colour. I then rolled out the fondant and cut out circle shapes using an egg cup. I then 'glued' the blue circles onto the white fondant using some more frosting.

By this time it had gone about half past 10 at night and I was beat. I decided it looked pretty good as it is and bypassed the bow. Maybe next year! Here it is!


Sorry for the lack of photos in this post, I didn't have my camera to hand when I was making it. My brother's requested a Chocolate Orange cake for his upcoming birthday so I'll make sure to take some more photos of that.

Sunday, 30 May 2010

My 20th ideas.

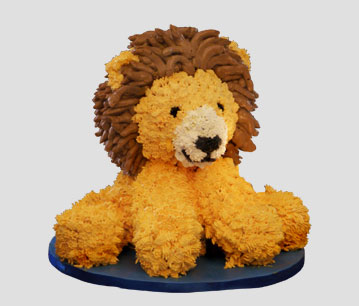
I've decided that after making Faye's cake I'm gonna try and make my own. The theme of my 20th is going to be the letter "L", so as I'm going as a lion I thought I'd try making a lion cake, something like this.


Haha, only kidding! I think that's slightly beyond me just yet. Probably something more like this:


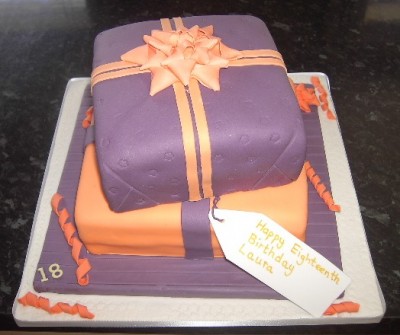
You should googleimage "Lion cake". Some of them are pretty damn funny! Anyway, so I think I'm going off the lion cake at the moment and might try and brave the design that I had for my 18th. The bottom layer was vanilla sponge and the top layer was chocolate.


I quite like the design of two parcels on top of each other. It will definately test my ability with fondant icing. Perhaps I'll need to do a couple of test runs...

Edit: Haha, just found this. Next Dinosaur Monday perhaps?

Saturday, 29 May 2010

Faye's Birthday Cake.

It was my flatmate Faye's 20th Birthday last Wednesday. Her party was on the Thursday so I decided to make some cupcakes and a birthday cake for her. After taking a trip to a huge Tesco, I completely forgot to buy sugar and flour. Luckily we had some in the cupboard and Faye picked some up for me while she was in town.

I started by making layer one of the birthday cake. We only have one sandwich tin and it's a small one so I decided on two layer cake. I used the sponge cake recipe that is memorised in my head. 4oz sugar, 4oz butter, 4oz flour and 2 eggs. I creamed the butter and sugar until it was fluffy and then alternated adding the flour and eggs. I spooned the mixture into the pan and then waited about 40 minutes hoping the oven was going to be nice to me today. It came out beautifully so I continued on with the second layer. This one decided to be a little bit trickier and half of it decided to stay in the pan when I wanted it to come out. After a little reconstructive surgery, it turned out alright. After allowing them to cool, I whipped up some buttercream to put the two slabs of cake together and then covered the whole cake in buttercream so the fondant icing would stick. I'd bought the fondant icing and it was my first time using it. There was a scary moment where the icing decided to stick to itself as I tried to get it flat over the cake but that was soon fixed and it went on pretty nice.

I trimmed the edges and just stuck some happy birthday candles on top, it was pretty simple but it looked nice.