Thursday, 30 December 2010

Christmas Presents!

I hope Santa treated you all well. I must've been good as I received a lovely new camera, a couple of recipe books, and these adorable Christmas tree decorations.
A cute Snowman!
Father Christmas!
 And here are some of the books I received this Christmas which will come in handy for my baking!


 I think "Kitchen" will encourage me to cook proper food as well, instead of just cake all the time! Did Santa bring you anything nice this Christmas?

Saturday, 25 December 2010

Merry Christmas!

I managed to miss out on all the Christmas baking in the run up to Christmas Day, so I'm afraid I have nothing to share with you all at the moment! My Mum did make a delicious Sticky Toffee Pudding which I intend to recreate here at some point, because it was sooo good!

Santa treated me to a new stash of recipe books, so I'm sure to have a post up here soon. 

Merry Christmas!

Tuesday, 21 December 2010

Brownie Pecan Pie


I adapted this idea from Bakerella's own version over at bakerella. I used recipes from the Hummingbird bakery book (namely the pie base, brownie mix and pecan pie recipe) and banged it all together in a similiar fashion.

I'm afraid I'll have to get back to you with the exact ingredients as I've returned home for Christmas and my copy of the book is up in Dundee. So for now, enjoy the photos!
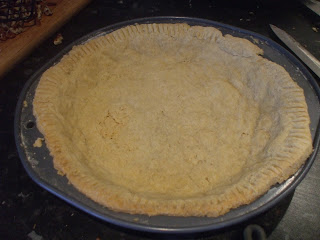
My first homemade pie base. You can tell!
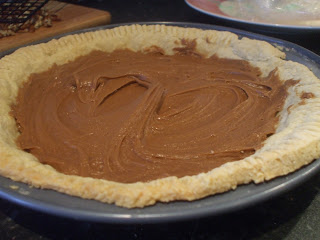
Filled with the brownie mixture.

And on top of that, the pecan mix.

After a good few hours in the oven!

Last slice left!

Monday, 13 December 2010

Christmas Tree Biscuits

I think I originally saw this idea on the Lakeland website. The idea is that using varying sizes of star cutters, you layer them up, ice them, and they will resemble a Christmas tree! Now, being a poor student, I tried ebay for a cheaper alternative, and got a set of 6 star cutters for around £3. Here's a set on Amazon that are similiar to the ones I used - Star cookie cutters.
 For the biscuit, I used the same recipe I used in the dinosaur biscuit post. Then I began to cut the stars for my biscuits. Now, I'd decided to give each of my friends one for Christmas, so I had to make 8. 8 Christmas trees at 11 biscuits each equals a lot of biscuits to bake and ice! So I reduced my Christmas trees down to 7 biscuits, and hoped that they still retained the tree look, rather than a bush.

I have to admit, I iced these rather sloppily as it was 11pm and I was ready for my bed! Of course, this did not affect the taste and my friends didn't seem to mind either.

I also forgot to take any photos until I'd bagged them - so I'm afraid we'll have to make do with the bagged product, but I think you can still see the gist of the idea.
So, there's the first of my Christmas baking! Now, it's off to the wonderland of revision...

Sunday, 12 December 2010

Pecan and Banana Bread

Whipped up a quick Pecan and Banana Bread when I was stranded at home due to the snow! You can't go wrong with a warm Banana bread and the pecans were just an added bonus.


Ingredients:
125g self raising flour
65g caster sugar
65g light brown sugar
125g butter
2 eggs
2 ripe bananas
50g pecans

Method:
1. Preheat oven to 180 degrees. Line a loaf tin with baking paper or grease with butter.
2. Cream together the sugars and the butter until light and fluffy.
3. Stir in one egg before adding half the flour. Repeat.
4. Mash up the bananas in a seperate bowl before stirring into the cake mixutre.
5. Chop up the pecans into small pieces and fold into the mixture, saving some for the top.
6. Pour the mixture into the loaf tin, before sprinkling on your remaining pecans.
7. Bake for around 30-40 minutes, or until a skewer inserted comes out clean.


I'll be back tomorrow with a Christmas related post which I used as a procrastination for revision! So, I'll leave you with a photo of my back garden in the snow...
 

Saturday, 4 December 2010

Christmas Treats!

Unfortunately, I'm at the beginning of the exam revision period. My days are about to be filled with hours of revision, all leading up to the scary three hour exam on the 17th. Yes, the 17th December. How cruel! Luckily, I've got an early Christmas to look forward to with friends coming up. Another thing keeping me in the Christmas spirit (despite all this snow!) are these blogs.


The Pink Whisk is run by Ruth Clements, one of the finalist's from the BBC2 series "The Great British Bake Off". Ruth is currently doing the "12 Days of Christmas", blogging about a different festive treat all the way until December 12th. I'm wanting to try out her version of Lebkuchen, the German gingerbead. I usually buy some from one of those budget German supermarkets but this year I will definitely try out hers!


"The Pink Whisk's" Lebkuchen!
Another blogger who is getting me into the Christmas spirit is Debbie over at Dulwich Munchies. Debbie is doing a sort of advent calender, with a treat or craft, accompanied by a song, for each day. Her Cinnamon Candy Canes especially look delicious! 

Debbie's "Cinnamon Candy Canes"
The ever wonderful Bakerella has some wonderful Christmas treats over at her blog. I love these cute Polar Bears in their snowglobes! If I could get my hands on some of those bottles I would make these in a heartbeat. 
"Bakerella's" Polar Bear Cupcakes
I hope this small selection of blogs gets you in the Christmas mood for baking! If you're making any Christmas treats, be sure to let me know! I will try my best to try and get a recipe up for you on Tuesday, but I'm afraid this is dependent on the trains getting me back up to Dundee.


Have a nice weekend, and be sure to take care on the icy pavements and roads!

Wednesday, 1 December 2010

Nutella Muffins!

Another post for you since for my absense the last two weeks. I whipped these up for movie night, and they are based on the recipe at BBC Good Food: Cinnamon Nutella Cake. This was for November's TSR bake club, this week chosen by Peachy Tarts.

I decided to make this cake as muffins instead because, my cake pans were currently lended out and muffins are always nice! 

Ingredients:
  • 175g softened butter
  • 175g golden caster sugar
  • 3 eggs
  • 200g self-raising flour
  • 1 tsp baking powder
  • 2 tsp ground cinnamon
  • 4 tbsp milk 
  • Nutella (or a similiar chocolate spread)
Method:
1. Preheat the oven to 180 degrees. Line a muffin/cupcake tin with paper cases.
2. Cream together the butter and sugar, before mixing in the sugar, eggs, flour, baking powder, cinnamon and milk. Beat together for around 2-3 minutes until the mixture is light and fluffy.
3.  Fill the cases around 3/4 full and add a small blob of the chocolate spread. Then, fill the rest of the case.
4. Bake in the oven for around 20-25 minutes, or until a skewer comes out clean.

My first batch were alright, though the nutella had sank to the bottom (as noted in the comment section) so this time I decided to add the nutella into the mixture. I used an electric mixer for this as due to the cold weather my nutella is quite solid! After mixing in the nutella, I just filled the cases and baked for 20-25 minutes.


Once baked and cooled, I used my usual frosting recipe but added in some nutella. If you do so, just keep taste testing until you have the flavour you want. If you're not up for free styling, there are a couple of nutella frosting recipes on the internet.
These were delicious warm and also cold! I'm (hopefully) off home for a couple of days from university, depending if I can get back in this snowy weather but, fingers crossed, I will be back with a recipe on Tuesday. 

I hope you have a nice weekend!

Tuesday, 30 November 2010

Pillow Cookies.

It's been far too long! I've had a hectic few weeks, with bad grades, a weekend away, and a portfolio due in. Sorry that I've been neglecting this blog, but I have a post for you today and I'll have one tomorrow to make up for the wait!

This week's recipe is 'Pillow Cookies' which I discovered over at Bakerella! Brownies IN cookies?! Sounds good to me!

Now because I would be making brownies and cookies, I decided to cheat a little (or as Bakerella reccommends!) and bought a box mix. But, I did make the cookies from scratch from a recipe from Hummingbird (Perhaps I should venture into different baking books?)


After whipping up the brownies according to the box instructions, I baked them and then allowed them to cool. Whilst they were doing that, I made up the cookie batter. I then cut the brownies into squares. Taking a tablespoon of cookie dough, I squidged it down onto a baking tray, placed the brownie square on top and then put some more dough over the brownie.


I then repeated this step many times and cooked for around 10-20 minutes. Here's an inside look of a cookie!
Doesn't it look good? Full recipe and instructions at Bakerella's Pillow Cookies. Enjoy!

Wednesday, 17 November 2010

Apologies

Afraid there's no blogpost this week. I've had a bit of a rubbish day with university so I'm not really feeling up to writing a blogpost but there will be one up on Monday!

Oh and I've recently set up a twitter account for another site I write for, so if you want to say hello please feel free to do so at @lauracraddock.

See you on Monday! 

Monday, 8 November 2010

Dinosaur Cake!

Around about a year ago, my friends and I gathered at our flat to watch Dinosaur movies on a Monday, hence the name 'Dinosaur Monday!' This Monday movie night turned into a tradition and now every Monday we gather at someone's flat and watch movies along with some baked goods. Last year the plan was to carve a Dinosaur out of brownies but as usual, the brownies were a complete fail due to our oven. So this year I decided to try again but with cake!

I used this recipe from The Caked Crusader and it was delicious! The sponge kept moist for days which was good because I had loads of cake left!

Ingredients:
225g unsalted butter, at room temperature
225g caster sugar
4 eggs
225g self raising flour
3 tablespoons cocoa powder
150ml milk

Method:
1. Preheat the oven to 160 degrees.
2. Line two 20cm cake tins with greaseproof paper.
3. Cream together the sugar and butter until pale and fluffy.
4. Slowly add in the eggs one at a time.
5. Add in the flour, cocoa and the milk.
6. Spoon the batter into the cake tins.
7. Bake the cakes for around 50 minutes or until a skewer inserted into the sponge comes out clean.
8. Leave the cakes to cool slightly in their tins before turning out onto a wire rack.

It's a delicious chocolate cake recipe, so if you just want a simple chocolate cake whip this up and add some buttercream to sandwich in the middle. Or, use it as a basis for a dinosaur as I did!

I got my template here! I think it's from Betty Crocker but I could also be imagining that! Simply print out and cut out the templates, and after your cake is cooled we're ready to go!

Now I must admit here that my cake was a little small for the template, so I just trimmed the template a little in order to make it fit. Then I placed the template on top of the sponge and with a sharp knife cut out my template.

I then made some green tinged vanilla buttercream to stick the head and tail to the body and also to the board before doing a crumb coat! A crumb coat is basically a thin coat of buttercream to seal in the crumbs. It was my first go at this so I was quite pleased! From my research on the web, most reccomend putting the cake in the freezer so the crumb coat sets but I didn't have enough room in my freezer and not a lot of time either, so I cleared a shelf in the fridge and left him in there for half an hour.

I then made some darker green vanilla buttercream and slathered it all other my dinosaur. I then used chocolate drops and chocolate and white buttons to decorate. 
I was really sad to cut up my dinosaur! I thought he looked quite cute! But, he had to go join his other dinosaurs in extinction...

Monday, 1 November 2010

Banoffee Cake Pie!

Okay, so it's really called 'Banoffee Cake' but somehow 'Banoffee Cake Pie' just rolls off my tongue. And it sort of makes sense! Being that Banoffee is usually a pie filling... Try saying it, I'm sure you'll agree! Anyhow, my friend's 20th birthday was last week and he loves bananas. I think he has an addiction. So I knew it had to be some sort of cake that included bananas. But I didn't want to just do a plain old banana bread, so the next thing that sprang to mind was 'Banoffee Pie' so I thought surely there must be some sort of Banoffee Cake and after a quick google,  there was!

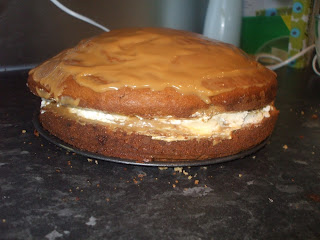
Now, as you can see from their picture I excluded the marshmallows. Not because I have anything against them, just I was on a budget so cut out all the unnecessary bits. Also, somehow in theirs they managed to cut their cake into three layers. Along with a number of people who commented on the recipe, mine didn't rise enough to cut it into three layers so I just cut it in half. To be honest, it would have been one beast of a cake if it was three!


 For the filling I just whipped some double cream and then chopped some ripe bananas into it before slathering onto the cake. I then used a can of caramel (I am too scared to try and make my own!) and spread that on top of the cream.
 For the topping I just used more of the caramel but not a lot because I was worried about the cake being too sickly!
 It wasn't the most pretty cake but it tasted good and the birthday boy liked it - the most important thing!
 Be sure to check back next week where I make Dinosaur cake!